
Welcome to the weekend, my friends! Can you believe we’re just a few days away from Christmas?? As I started writing this today, I realized this will be the 500th Little Things newsletter! This was never really something I planned to do. I just really enjoy sharing our life with you in this way and so I’ve continued writing these emails every Saturday morning.
The world of food blogging has changed a lot over the past 15 years and when I started writing these newsletters almost 10 years ago, it was my way of trying to stay connected with you all despite the internet’s push to “just share the recipe” and stop telling stories along with the foods we share.
Today, to celebrate both my love of Christmas and the fun of sending you this 500th newsletter, I’m giving away $500 in Amazon gift cards.
I enjoy celebrating the holidays so much and I love hearing about your family’s favorite traditions. All you need to do to be entered is leave a comment on this blog post and tell me about your favorite Christmas tradition!
On Tuesday, December 23rd, I’ll pick 5 of the comments that have been left on this blog post and send a $100 Amazon card to each of those readers just for the fun of it. The winners will be notified via the email used to leave a comment on the website.
(Unfortunately, as much as I enjoy receiving your emails, replies via email can’t be included in this giveaway, it’s simply too difficult to track entries that way.)
I’ll go first by sharing my favorite Christmas memory:
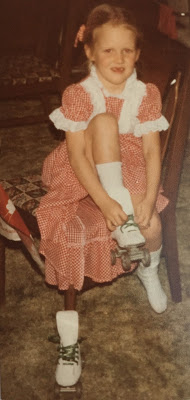
When I was 8 years old, I wanted roller skates for Christmas. My mom managed to find a pair of skates, the old-fashioned kind with metal wheels. These were nothing like the skates my friends had, but they were skates and she was so happy to have found them. She cleaned them up and set them aside for me.
However, the old skates needed new laces. She had no spare money for the laces, but she gathered all the change, mostly pennies, in the house and she went to the store.
She took her pile of pennies and a package of laces to the counter at the store and the young and impatient clerk told her that she wasn’t going to take pennies. My mom started crying, but she held her ground and told the clerk that it was still good money and she needed those laces for Christmas. Thanks to help from the gentleman in line behind her, the clerk finally sold her the laces and she brought them home.
When I opened my gift of the skates on Christmas morning, I had no idea how much work and how many tears had gone into those skates. I was just thrilled to be tying on my first pair of roller skates.
For that memory and so many others, thank you Mom. You taught me to be grateful for everything. You taught me that finding joy in the small pleasures of life is far more fun than always looking towards the next big thing.
 Read more