Mom’s Easy Pie Crust Recipe (for Beginners)

Web Admin 0 29 Article rating: No rating
a baked bottom homemade pie crust

This easy pie crust recipe is flaky, tender and made from scratch with simple ingredients, including shortening, egg and vinegar. There’s no chilling required, so you can roll it out right away and no pie weights required for blind baking!!

This recipe has been passed down from my grandma to my mom and now to me, and it’s one of those family recipes I hope my girls will pass down someday, too! We call it Mom’s Fail-Proof Magic Pie Crust, and once you learn a few simple tricks, you’ll see that making homemade pie crust really isn’t as intimidating as it seems!

QUICK LOOK

  • Prep Time: Approximately 15 minutes
  • Chill Time: None required!
  • Yield: 2 single pie crusts or 1 double-crust pie
  • Skill Level: Beginner-friendly
  • Make Ahead: Freeze the extra dough for up to 3 months

Why You’ll Love This Easy Pie Crust Recipe

  • Flaky and tender: Shortening creates a deliciously tender crust that’s perfect for all your favorite pies.
  • No chilling required: Mix, roll and shape your dough without waiting for it to rest!
  • Simple ingredients: Grandma’s secret additions of egg and vinegar make this old-fashioned recipe extra special.
  • Makes two crusts: Use both for a double-crust pie or freeze one for later!

Ingredients You’ll Need

You only need a few simple ingredients to make Grandma’s homemade pie crust!

  • All-Purpose Flour: Gives the crust structure while keeping it tender.
  • Salt: Enhances the flavor of the crust.
  • Shortening: The secret to a tender, flaky pie crust! Make sure it’s chilled before using. I highly recommend using butter flavored if you have it for even more flavor!
  • Egg: Helps bind the dough together and contributes to its texture.
  • Vinegar: Grandma’s special addition! Adds acidity to the dough without making the crust taste like vinegar.
  • Ice Water: Keeps the shortening cold while bringing the dough together.

PRO TIP: Use cold shortening and ice water! Keeping the fat cold helps create a flaky crust instead of a dense, tough one.

How to Make Homemade Pie Crust

You don’t need any

Gooey Butter Cake (Paula Deen’s Original Recipe)

Web Admin 0 58 Article rating: No rating
Gooey Butter Cake (Paula Deen’s Original Recipe)

If there is one dessert worth making this week, it is Paula Deen’s gooey butter cake. This is the original recipe and it’s so easy with only a yellow cake mix, butter, cream cheese and eggs and it has that classic ooey, gooey middle!

If you’re craving the fall version:

Try our Pumpkin Gooey Butter Cake which adds pumpkin and warm spices to this classic dessert.

Now don’t be confused, this is NOT the traditional St. Louis bakery version. This is Paula Deen’s original gooey butter cake recipe—the easy cake-mix version that made this rich, gooey dessert famous with home bakers.

Don’t worry, I’ll take you through all the trouble shooting below, but first, here’s one I don’t want you to miss:

How do I get the perfect gooey center?

This is so important!! 🚨 Don’t Wait for the Center to Look Fully Set!

You must do the jiggle test on an ooey-gooey dessert. It’s going to look undone, but give the pan a jiggle and then take the cake out of the oven when the edges are golden brown but the center still moves slightly.
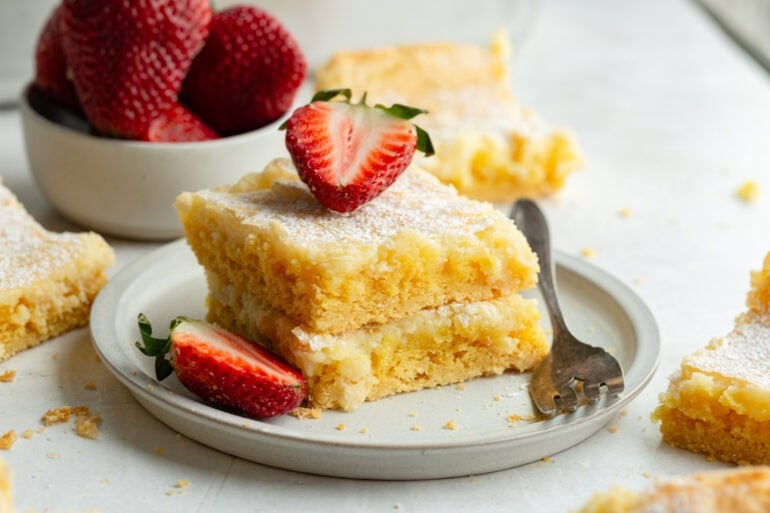
A plate of stacked slices of ooey gooey butter cake topped with powdered sugar and sliced strawberries

What Does Gooey Butter Cake Taste Like?

Imagine a buttery, melt in your mouth yellow-cake crust topped with a rich cream-cheese custard that’s sweet, soft and just a little gooey in the center. It’s somewhere between a cake, cheesecake bar and blondie—but much more wonderful.

This is a pure Southern comfort recipe. Our Ooey Gooey Butter Cake with a dusting of powdered sugar on top makes it look as good as it tastes.

The Surprising Twist on How We Eat Our Gooey Butter Cake

Fair warning: Claire and I did extensive testing on the best way to eat this cake, and the unanimous winner was straight from the fridge the next day. Chilled, dense, and impossibly rich with that cold sprinkle of powdered sugar on top. Do not skip that step.

Read more

Red, White & Blue Funfetti Dip

Web Admin 0 224 Article rating: No rating
Red, White & Blue Funfetti Dip

This Red, White & Blue Funfetti Dip is the party treat you didn’t know your summer needed. It’s fluffy, creamy, sweet in the best possible way, and it comes together with just 3 ingredients in about 5 minutes flat. No bake. No fuss. Just a bowl, a spoon, and a very exciting amount of sprinkles.

A photo of Funfetti Dip topped with a generous pile of colorful red white and blue sprinkles sitting on a white marble surface next to a stack of graham crackers and nilla wafers.

Okay, friends. I need you to stop whatever you’re doing right now, because I have the most festive, most fun, most could-not-be-easier 4th of July recipe for you, and it involves cake batter. Yes. CAKE BATTER. In a dip. This Red, White & Blue Funfetti Dip is the easiest and most festive 4th of July treat you’ll ever make!

We’ve made this for every 4th of July cookout I can remember, and every single time, the bowl gets scraped clean before the fireworks even start. Kids go absolutely wild for it. Adults go right along with them. And honestly? I think that’s the most patriotic thing of all. Grab the graham crackers, we’re celebrating!

A overhead photo of Funfetti Dip in a serving bowl topped with colorful sprinkles and surrounded by Nilla wafers and graham crackers on a beige platter.

Ingredients For Funfetti Dip

Can we talk about how three humble ingredients somehow create the most magical, celebratory dip you’ve ever tasted? It feels like a little kitchen miracle every single time. Here’s what you’ll need, and I promise you can find all of

Easy Chicken Taco Casserole

Web Admin 0 294 Article rating: No rating
Easy Chicken Taco Casserole

If you need a tasty dinner, be sure to try this cheesy Chicken Taco Casserole. We love family-friendly, easy, comfort food recipes that are a simple addition to our weeknight dinner rotation.

Ingredients For Chicken Taco Casserole

This chicken taco casserole recipe is full of bright flavors and melty cheese goodness! It’s an easy dish that is satisfying without being heavy. Here’s what you need:

Casserole Base

  • Shredded Chicken: Adds hearty protein and makes the dish filling and satisfying. Rotisserie chicken works great for this recipe!
  • Olive Oil: Helps sauté the aromatics and adds a light, rich base flavor.
  • Onion: Builds depth and savory flavor as it cooks down.
  • Chicken Broth: Cooks the rice while infusing the dish with flavor.
  • Red Enchilada Sauce: Brings warmth, spice, and classic enchilada flavor throughout.
  • Black Beans: Add texture, fiber, and a subtle earthy balance.
  • Rotel Tomatoes & Green Chilies: Provide acidity, moisture, and a mild kick of heat.
  • Long-Grain Rice: Absorbs all the flavors and gives the dish its comforting structure.
  • Mexican-Blend Cheese: Melts into the dish for a creamy, cheesy finish.

Optional Toppings

  • Sour Cream: Cools and balances the spices. Can swap for plain Greek yogurt.
  • Sliced Jalapeños: Add fresh heat and crunch.
  • Cilantro: Brightens the dish with fresh, herbal flavor.
  • Salsa: Adds extra moisture and layered flavor.
  • Tomatoes: Bring freshness and a juicy pop of acidity.
Chicken taco casserole baked until bubbly in an enameled pan, close-up angle

How to Make Chicken Taco Casserole

This Mexican chicken and rice casserole is an easy dinner made with simple ingredients and bold flavors. Everything bakes together in one dish for a meal that’s perfect for busy nights.

  1. Preheat: Heat the oven to 350°F. See note below for stovetop directions for a faster meal.
  2. Cook: Prepare the

Easy Chicken Taco Salad

Web Admin 0 315 Article rating: No rating
Chicken taco salad in a large serving bowl. There is chicken, tomatoes, corn, beans, red onions, peppers and cheese. A sliced avocado and 2 lime wedges are on top. There are chips and a container of dressing are next to the salad.

When the weather gets hot, this Chicken Taco Salad is the dinner we make on repeat. It’s fresh, crunchy, loaded with juicy taco-seasoned grilled chicken, and tossed with the most delicious creamy taco salad dressing.

It’s everything we love about taco night piled onto a big bowl of crisp lettuce instead. It is fast, satisfying, and one of those meals everyone in the family loves!

A large bowl of chicken taco salad. There is shredded chicken, cheese, cilantro, beans, corn, tomatoes, red onions, peppers and sliced avocados. There are 2 lime wedges next to the salad and chips and dressing in the background.

After everyone went crazy for our Ground Beef Taco Salad I just knew we had to make a grilled chicken taco salad version. I mean, how can you not make another taco salad? It’s a must!

Why You’ll Love This Chicken Taco Salad

  • Fresh and flavorful – crunchy lettuce, juicy chicken, and tons of toppings
  • Easy weeknight dinner – ready in about 30 minutes
  • Healthy-ish comfort food – all the taco flavor without the heavy fried shell
  • Totally customizable – add your favorite toppings
  • Perfect for summer meals when it’s too hot to cook

Ingredients You’ll Need

The beauty of this grilled chicken taco salad is how simple it is. A few fresh ingredients, juicy taco chicken, and a creamy homemade taco salad dressing come together to make a salad that’s anything but boring.

  • Taco Chicken: Boneless chicken breasts are coated in taco seasoning and grilled until juicy and flavorful.
  • Romaine: Perfect for taco salad because it stays crisp and adds that classic chopped salad crunch.
  • Black Beans: Add protein, fiber, and that classic Tex-Mex flavor.
  • Corn: Adds freshness and a little sweetness that balances the savory ingredients.
  • Cheese: Shredded cheddar or a Mexican blend adds creaminess and richness.
  • Tomatoes: Bring brightness and juiciness to t
RSS
1234567